Learn To Customize Your Glasses
Personalizing your glasses can be an excellent idea to give new life to those that you do not use daily because they are too “boring”.
We often accumulate different types of glass containers, which together are too simple. When you open your cupboard do you discover that you have too many glasses?
Wherever you look, there are those that a family member gave you, everyday glasses, celebration glasses, children’s glasses, and so on.
Surely you would like them to be more colorful, so we suggest that you learn how to personalize your glasses.
The idea is to take advantage of the “blank” glass surface and decorate it to your liking. You can give a general reason to all or, you can classify them and assign to each group, a type of special design.
A good idea is to play with different designs but keep the same colors. However, everything will depend on your creativity and your preferences.
Here are some ideas for you to learn how to personalize your glasses with very simple tools and in just a few steps. You will see that you will achieve very good results.
Dare to get down to work!
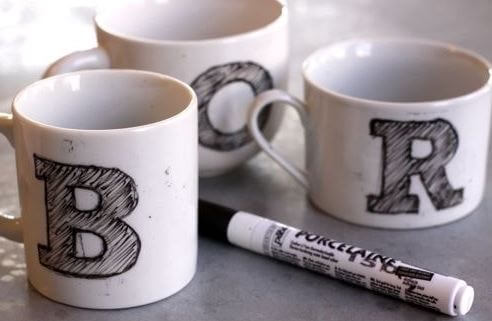
How to personalize your glasses with a marker

Before making any design, we must take into account a couple of things. The first, that the glass is clean and dry.
The second, the type of design you want to make. To do this, you can make a pencil sketch on a sheet of paper, to get an idea of the result. In this way, you will avoid being upset if something is not to your liking.
Once you have the design clear, take a permanent marker (black or the color of your choice) and start drawing on the glass.
For the first attempts, it is recommended to opt for simple designs that are easy to draw freehand.
Any ideas
1. A circle, a square, an X and a triangle around
Surely fans of video games have already noticed. If you like, you can even make them the color they appear on the PlayStation.
2. Make a simple drawing
For example, you can draw a sailboat with the black permanent marker.
3. Write a name
Just write your name or a special short phrase in nice handwriting. If you have a special friend, decorate this person’s name as well and make it their special glass when they come to visit. Of course, you can also write the names of the people who live with you.
4. Write the name of a drink
Assign the type of drink for which you will use each glass by putting the name of each one on the glass.
Remember to do it in a decorative way. Thus, for example, if it is a commercial brand drink, use markers of various colors to draw the logo.
If it is a natural drink, draw the fruit from which the drink is made into the glass.
Customize your glasses with paint

We’re going to get a little more complex here. If you love painting and decorating, follow these steps to personalize your glasses with frosted paint.
Materials
- Brush.
- Glass beakers.
- Paper for lining.
- A pair of scissors.
- Paper cutter.
- Frosted spray paint.
- Patterned paper punch.
Steps to personalize your glasses
Before starting, make sure your glass is clean and dry.
- Cut a strip of contact paper that is the same thickness as the hole punch shape. The length of this strip should be equal to the circumference of the glass.
- Once you have the strip, use the hole punch or die cutter to pierce the design. You must be careful with this step of giving a firm blow with the hole punch so that the cut is clean. Remember that you are going to drill on plastic, which can be a bit tricky.
- When you have your strip with the designs already perforated, peel off the lining paper from the protective paper.
- Very carefully, tape this strip of contact paper around your glass. You can choose whether to make the design on the top, middle or bottom of your glass.
- Make sure there are no air bubbles between the cup and the adhesive on the liner, otherwise the paint could get stuck there. Get rid of bubbles by pressing the air out.
- Using a paintbrush, begin to paint over the designs on the contact paper. Do not apply a very thick layer as it can come with the paper when you peel it off the glass.
- Let it dry and then very carefully peel off the lining paper.
- Clever!
Don’t let hole punch designs limit you. You have in your hand a frosted paint that, as you can see, gives a special touch to your glasses.
Don’t limit your imagination and make other designs on your glasses. For example, you can make strips of contact paper and simply put them in your glass as you prefer and then paint the spaces between the strips.
We invite you to personalize your glasses to give them a special and unique touch. Follow the steps that we suggest to get a nice collection of personalized glasses.